Managing user accounts and permissions
Managing User Accounts and Permissions in Windows 11
Managing
user accounts and permissions in Windows 11 is crucial for maintaining security
and control over system resources. This guide will walk you through the steps
to create, modify, and manage user accounts, as well as how to set permissions
for users effectively.
1. Accessing User Accounts Settings
To manage
user accounts in Windows 11, you need to access the Settings menu.
Steps to Access User Accounts:
- Open Settings:
- Click on the Start Menu
and select the Settings gear icon or press Windows Key + I.
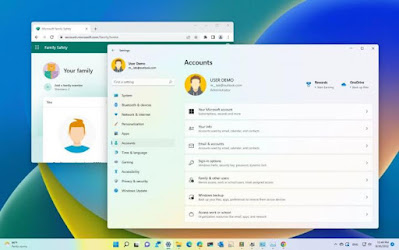
- Navigate to Accounts:
- In the Settings window,
click on Accounts in the left sidebar.
2. Creating a New User Account
Creating
a new user account allows you to manage different users on the same computer.
Steps to Create a New User Account:
- Select Family & Other
Users:
- Under the Accounts section,
select Family & other users.
- Add a New User:
- Under the Other users
section, click on Add account.
- Choose Account Type:
- You can either use a
Microsoft account or create a local account. For a local account, select I
don’t have this person’s sign-in information, and then click on Add
a user without a Microsoft account.
- Fill in User Information:
- Enter the username,
password, and password hint for the new account, then click Next.
3. Changing Account Type
You can
change the type of account from Standard User to Administrator or vice versa.
Steps to Change User Account Type:
- Locate the User:
- In the Family &
other users section, find the user account you wish to modify.
- Change Account Type:
- Click on the account name,
then select Change account type.
- Select the Account Type:
- Choose either Administrator
or Standard User from the dropdown menu and click OK.
4. Managing Permissions for User Accounts
Permissions
control what actions a user can perform on the system. Here’s how to manage
permissions:
Steps to Manage Permissions:
- Access User Account
Settings:
- Go back to Settings >
Accounts > Family & other users.
- Select the User Account:
- Click on the user account
for which you want to manage permissions.
- Edit Permissions:
- Depending on your version
of Windows 11, you may find options such as Remove or Change
account type.
5. Adding User Permissions for File and Folder
Access
You may
want to set specific permissions for files and folders to control access.
Steps to Manage File and Folder Permissions:
- Locate the Folder:
- Navigate to the folder you
want to manage permissions for.
- Right-click and Select
Properties:
- Right-click on the folder
and select Properties from the context menu.
- Go to Security Tab:
- In the Properties window,
switch to the Security tab.
- Edit Permissions:
- Click on the Edit
button to change permissions.
- Select a User:
- In the Permissions window,
select the user you wish to edit permissions for or click Add to
include a new user.
- Set Permissions:
- Check the boxes for the
permissions you want to grant (e.g., Read, Write, Modify, etc.) and click
OK to apply.
6. Removing a User Account
If you
need to remove a user account, follow these steps:
Steps to Remove a User Account:
- Access User Accounts:
- Go to Settings >
Accounts > Family & other users.
- Select the User Account:
- Click on the user account
you wish to remove.
- Remove the Account:
- Click on Remove,
then confirm the action to delete the account.
Conclusion
Managing
user accounts and permissions in Windows 11 helps maintain security and ensures
that users have appropriate access to system resources. By following the steps
outlined in this guide, you can easily create, modify, and manage user
accounts, as well as adjust permissions for files and folders to enhance
security and organization within your computing environment.


